You will find the chapter examples in the assets folder.
Translations started for Italian, German and Portuguese. Use the floating menu on the bottom right.
The source of this fork of the book is hosted on GitHub (fork temporarily used for translation). The original source is hosted on GitHub. The original source is hosted on Patches, suggestions and comments are welcome.

Multimedia
Section author: e8johan
Note
Last Build: March 14, 2018 at 02:55 CET
The source code for this chapter can be found in the assets folder.
The multimedia elements in the QtMultimedia makes it possible to playback and record media such as sound, video or pictures. Decoding and encoding is handled through platform specific backends. For instance, the popular gstreamer framework is used on Linux, while DirectShow is used on Windows and QuickTime on OS X.
The multimedia elements are not a part of the Qt Quick core API. Instead, they are provided through a separate API made available by importing QtMultimedia 5.6 as shown below:
import QtMultimedia 5.6
Playing Media
The most basic case of multimedia integration in a QML application is for it to playback media. This is done using the MediaPlayer element, optionally in combination with a VideoOutput element if the source is an image or video. The MediaPlayer element has a source property pointing at the media to play. When a media source has been bound, it is simply a matter of calling the play function to start playing.
If you want to play visual media, i.e. pictures or video, you must also setup a VideoOutput element. The MediaPlayer running the playback is bound to the video output through the source property.
In the example shown below, the MediaPlayer is given a file with video contents as source. A VideoOutput is created and bound to the media player. As soon as the main component has been fully initialized, i.e. at Component.onCompleted, the player’s play function is called.
import QtQuick 2.5
import QtMultimedia 5.6

Item {
    width: 1024
    height: 600

    MediaPlayer {
        id: player
        source: "trailer_400p.ogg"
    }

    VideoOutput {
        anchors.fill: parent
        source: player
    }

    Component.onCompleted: {
        player.play();
    }
}
Basic operations such as altering the volume when playing media is controlled through the volume property of the MediaPlayer element. There are other useful properties as well. For instance, the duration and position properties can be used to build a progress bar. If the seekable property is true, it is even possible to update the position when the progress bar is tapped. The example below shows how this is added to the basic playback example above.
    Rectangle {
        id: progressBar

        anchors.left: parent.left
        anchors.right: parent.right
        anchors.bottom: parent.bottom
        anchors.margins: 100

        height: 30

        color: "lightGray"

        Rectangle {
            anchors.left: parent.left
            anchors.top: parent.top
            anchors.bottom: parent.bottom

            width: player.duration>0?parent.width*player.position/player.duration:0

            color: "darkGray"
        }

        MouseArea {
            anchors.fill: parent

            onClicked: {
                if (player.seekable) {
                    player.position = player.duration * mouse.x/width;
                }
            }
        }
    }
The position property is only updated once per second in the default case. This means that the progress bar will update in large steps unless the duration of the media is long enough, compared to the number pixels that the progress bar is wide. This can, however, be changed through accessing the mediaObject property and its notifyInterval property. It can be set to the number of milliseconds between each position update, increasing the smoothness of the user interface.
    Connections {
        target: player
        onMediaObjectChanged: {
            if (player.mediaObject) {
                player.mediaObject.notifyInterval = 50;
            }
        }
    }
Todo
The code above does not have any effect on the update interval! There seems to be no media object...
When using MediaPlayer to build a media player, it is good to monitor the status property of the player. It is an enumeration of the possible statuses, ranging from MediaPlayer.Buffered``to ``MediaPlayer.InvalidMedia. The possible values are summarized in the bullets below:
MediaPlayer.UnknownStatus. The status is unknown.MediaPlayer.NoMedia. The player has no media source assigned. Playback is stopped.MediaPlayer.Loading. The player is loading the media.MediaPlayer.Loaded. The media has been loaded. Playback is stopped.MediaPlayer.Stalled. The loading of media has stalled.MediaPlayer.Buffering. The media is being buffered.MediaPlayer.Buffered. The media has been buffered, this means that the player can start playing the media.MediaPlayer.EndOfMedia. The end of the media has been reached. Playback is stopped.MediaPlayer.InvalidMedia. The media cannot be played. Playback is stopped.
As mentioned in the bullets above, the playback state can vary over time. Calling play, pause or stop alters the state, but the media in question can also have effect. For example, the end can be reached, or it can be invalid, causing playback to stop. The current playback state can be tracked through the playbackState property. The values can be MediaPlayer.PlayingState, MediaPlayer.PausedState or MediaPlayer.StoppedState.
Using the autoPlay property, the MediaPlayer can be made to attempt go to the playing state as soon as a the source property is changed. A similar property is the autoLoad causing the player to try to load the media as soon as the source property is changed. The latter property is enabled by default.
It is also possible to let the MediaPlayer to loop a media item. The loops property controls how many times the source is to be played. Setting the property to MediaPlayer.Infinite causes endless looping. Great for continious animations or a looping background song.
Sound Effects
When playing sound effects, the response time from requesting playback until actually playing becomes important. In this situation, the SoundEffect element comes in handy. By setting up the source property, a simple call to the play function immediately starts playback.
This can be utilized for audio feedback when tapping the screen, as shown below.
    SoundEffect {
        id: beep
        source: "beep.wav"
    }

    Rectangle {
        id: button

        anchors.centerIn: parent

        width: 200
        height: 100

        color: "red"

        MouseArea {
            anchors.fill: parent
            onClicked: beep.play()
        }
    }
The element can also be utilized to accompany a transition with audio. To trigger playback from a transition, the ScriptAction element is used.
    SoundEffect {
        id: swosh
        source: "swosh.wav"
    }

    transitions: [
        Transition {
            ParallelAnimation {
                ScriptAction { script: swosh.play(); }
                PropertyAnimation { properties: "rotation"; duration: 200; }
            }
        }
    ]
In addition to the play function, a number of properties similar to the ones offered by MediaPlayer are available. Examples are volume and loops. The latter can be set to SoundEffect.Infinite for infinite playback. To stop playback, call the stop function.
Note
When the PulseAudio backend is used, stop will not stop instantaneously, but only prevent further loops. This is due to limitations in the underlying API.
Video Streams
The VideoOutput element is not limited to usage in combination with MediaPlayer elements. It can also be used directly with video sources to show a live video stream. Using a Camera element as source and the application is complete. The video stream from a Camera can be used to provide a live stream to the user. This stream works as the search view when capturing photos.
import QtQuick 2.5
import QtMultimedia 5.6

Item {
    width: 1024
    height: 600

    VideoOutput {
        anchors.fill: parent
        source: camera
    }

    Camera {
        id: camera
    }
}
Capturing Images
One of the key features of the Camera element is that is can be used to take pictures. We will use this in a simple stop-motion application. In it, you will learn how to show a viewfinder, snap photos and to keep track of the pictures taken.
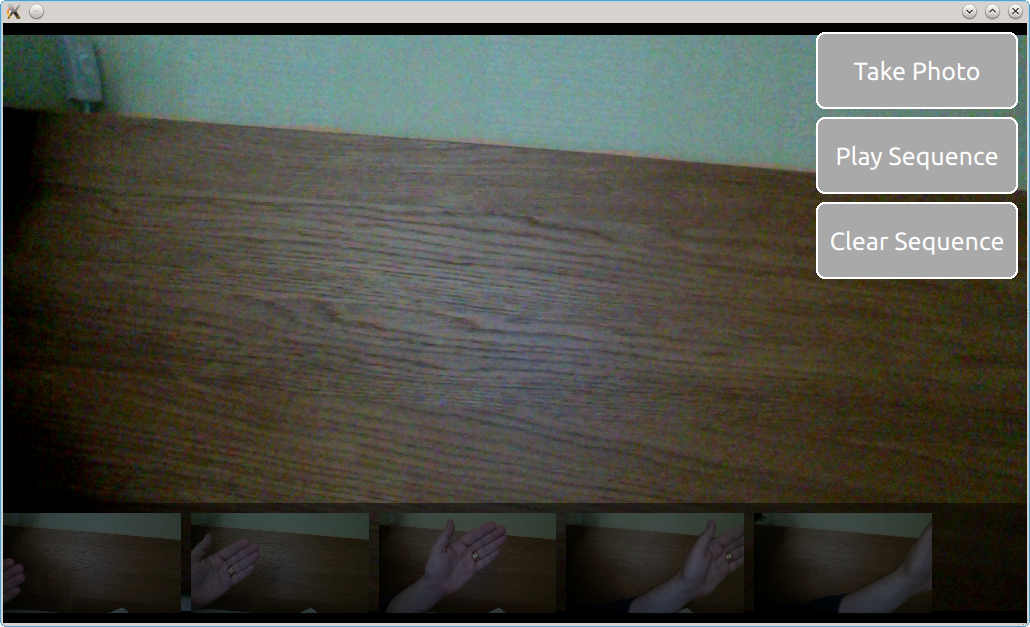
The user interface is shown below. It consists of three major parts. In the background, you will find the viewfinder, to the right, a column of buttons and at the bottom, a list of images taken. The idea is to take a series of photos, then click the Play Sequence button. This will play the images back, creating a simple stop-motion film.
The viewfinder part of the camera is simply a Camera element used as source in a VideoOutput. This will show the user a live videostream from the camera.
    VideoOutput {
        anchors.fill: parent
        source: camera
    }

    Camera {
        id: camera
    }
The list of photos is a ListView oriented horizontally shows images from a ListModel called imagePaths. In the background, a semi-transparent black Rectangle is used.
    ListModel {
        id: imagePaths
    }

    ListView {
        id: listView

        anchors.left: parent.left
        anchors.right: parent.right
        anchors.bottom: parent.bottom
        anchors.bottomMargin: 10

        height: 100

        orientation: ListView.Horizontal
        spacing: 10

        model: imagePaths

        delegate: Image {
            height: 100
            source: path
            fillMode: Image.PreserveAspectFit
        }

        Rectangle {
            anchors.fill: parent
            anchors.topMargin: -10

            color: "black"
            opacity: 0.5
        }
    }
For the shooting of images, you need to know that the Camera element contains a set of sub-elements for various tasks. To capture still pictures, the Camera.imageCapture element is used. When you call the capture method, a picture is taken. This results in the Camera.imageCapture emitting first the imageCaptured signal followed by the imageSaved signal.
        Button {
            id: shotButton

            text: "Take Photo"
            onClicked: {
                camera.imageCapture.capture();
            }
        }
To intercept the signals of a sub-element, a Connections element is needed. In this case, we don’t need to show a preview image, but simply add the resulting image to the ListView at the bottom of the screen. Shown in the example below, the path to the saved image is provided as the path argument with the signal.
    Connections {
        target: camera.imageCapture

        onImageSaved: {
            imagePaths.append({"path": path})
            listView.positionViewAtEnd();
        }
    }
For showing a preview, connect to the imageCaptured signal and use the preview signal argument as source of an Image element. A requestId signal argument is sent along both the imageCaptured and imageSaved. This value is returned from the capture method. Using this, the capture of an image can be traced through the complete cycle. This way, the preview can be used first and then be replaced by the properly saved image. This, however, is nothing that we do in the example.
The last part of the application is the actual playback. This is driven using a Timer element and some JavaScript. The _imageIndex variable is used to keep track of the currently shown image. When the last image has been shown, the playback is stopped. In the example, the root.state is used to hide parts of the user interface when playing the sequence.
    property int _imageIndex: -1

    function startPlayback()
    {
        root.state = "playing";
        setImageIndex(0);
        playTimer.start();
    }

    function setImageIndex(i)
    {
        _imageIndex = i;

        if (_imageIndex >= 0 && _imageIndex < imagePaths.count)
            image.source = imagePaths.get(_imageIndex).path;
        else
            image.source = "";
    }

    Timer {
        id: playTimer

        interval: 200
        repeat: false

        onTriggered: {
            if (_imageIndex + 1 < imagePaths.count)
            {
                setImageIndex(_imageIndex + 1);
                playTimer.start();
            }
            else
            {
                setImageIndex(-1);
                root.state = "";
            }
        }
    }
Advanced Techniques
Todo
The Camera API of Qt 5 is really lacking in documentation right now. I would love to cover more advanced camera controls such as exposure and focusing, but there are no ranges or values, nor clear guides to how to use the APIs in the reference docs right now.
Implementing a Playlist
The Qt 5 multimedia API does not provide support for playlists. Luckly, it is easy to build one. The idea is to be able to set it up with a model of items and and a MediaPlayer element, as shown below. The Playlist element is resposible for setting the source of the MediaPlayer, while the playstate is controlled via the player.
    MediaPlayer {
        id: player
        playlist: Playlist {
            PlaylistItem { source: "trailer_400p.ogg" }
            PlaylistItem { source: "trailer_400p.ogg" }
            PlaylistItem { source: "trailer_400p.ogg" }
        }
    }
The first half of the Playlist element, shown below, takes care of setting the source element given an index in the setIndex function. It also implements the next and previous functions to navigate the list.
Item {
    id: root

    property int index: 0
    property MediaPlayer mediaPlayer
    property ListModel items: ListModel {}

    function setIndex(i) {
        console.log("setting index to: " + i);

        index = i;

        if (index < 0 || index >= items.count) {
            index = -1;
            mediaPlayer.source = "";
        } else {
            mediaPlayer.source = items.get(index).source;
        }
    }

    function next() {
        setIndex(index + 1);
    }

    function previous() {
        setIndex(index + 1);
    }
The trick to make the playlist continue to the next element at the end of each element is to monitor the status property of the MediaPlayer. As soon as the MediaPlayer.EndOfMedia state is reached, the index is increased and playback resumed, or, if the end of the list is reached, the playback is stopped.
    Connections {
        target: root.mediaPlayer

        onStopped: {
            if (root.mediaPlayer.status == MediaPlayer.EndOfMedia) {
                root.next();
                if (root.index == -1) {
                    root.mediaPlayer.stop();
                } else {
                    root.mediaPlayer.play();
                }
            }
        }
    }
Summary
The media API provided by Qt provides mechanisms for playing and capturing video and audio. Through the VideoOutput element and video source can be displayed in the user interface. Through the MediaPlayer element, most playback can be handled, even though the SoundEffect can be used for low-latency sounds. For capturing, or only showing a live video stream, the Camera element is used.