You will find the chapter examples in the assets folder.
Translations started for Italian, German and Portuguese. Use the floating menu on the bottom right.
The source of this fork of the book is hosted on GitHub (fork temporarily used for translation). The original source is hosted on GitHub. The original source is hosted on Patches, suggestions and comments are welcome.

Extending QML with C++
Autore della sezione: jryannel
Nota
Last Build: marzo 14, 2018 at 02:55 CET
The source code for this chapter can be found in the assets folder.
Executing QML within the confined space that QML as a language offers can sometimes be limiting. By extending the QML run-time with native functionality written in C++, the application can utilize the full performance and freedom of the base platform.
Understanding the QML Run-time
When running QML, it is being executed in a run-time environment. The run-time is implemented in C++ in the QtQml module. It consists of an engine, responsible for the execution of QML, contexts, holding the properties accessible for each component, and components, the instantiated QML elements.
#include <QtGui>
#include <QtQml>

int main(int argc, char **argv)
{
    QGuiApplication app(argc, argv);
    QUrl source(QStringLiteral("qrc:/main.qml"));
    QQmlApplicationEngine engine;
    engine.load(source);
    return app.exec();
}
In the example the QGuiApplication encapsulates all that is related to the application instance (e.g. application name, command line arguments and managing the event loop). The QQmlApplicationEngine manages the hierarchical order of contexts and components. It requires typical a qml file to be loaded as the starting point of your application. In this case it is a main.qml containing a window and a text type.
Nota
Loading a main.qml with a simple Item as the root type through the QmlApplicationEngine will not show anything on your display, as it requires a window to manage a surface for rendering. The engine is capable of loading qml code which does not contain any user interface (e.g plain objects). Because of this it does not create a window for you by default. The qmlscene or the new qml runtime will internally first check if the main qml file contains a window as a root item and if not create one for you and set the root item as a child to the newly created window.
import QtQuick 2.5
import QtQuick.Window 2.2

Window {
    visible: true
    width: 512
    height: 300

    Text {
        anchors.centerIn: parent
        text: "Hello World!"
    }
}
In the qml file we declare our dependencies here it is QtQuick and QtQuick.Window. These declaration will trigger a lookup for these modules in the import paths and on success will load the required plugins by the engine. The newly loaded types will then be made available to the qml file controlled by a qmldir.
Is it also possible to shortcut the plugin creation by adding our types directly to the engine. Here we assume we have a CurrentTime QObject based class.
QQmlApplicationEngine engine;

qmlRegisterType<CurrentTime>("org.example", 1, 0, "CurrentTime");

engine.load(source);
Now we can also use the CurrentTime type in our qml file.
import org.example 1.0

CurrentTime {
    // access properties, functions, signals
}
For the really lazy there is also the very direct way through context properties.
QScopedPointer<CurrentTime> current(new CurrentTime());

QQmlApplicationEngine engine;

engine.rootContext().setContextProperty("current", current.value())

engine.load(source);
Nota
Do not mix up setContextProperty() and setProperty(). The first on sets a context property on a qml context, and setProperty() sets a dynamic property value on a QObject and will not help you.
Now you can use the current property everywhere in your application. Thanks to context inheritance.
import QtQuick 2.5
import QtQuick.Window 2.0

Window {
    visible: true
    width: 512
    height: 300

    Component.onCompleted: {
        console.log('current: ' + current)
    }
}
Here are the different ways you can extend QML in general:
- Context properties -
setContextProperty() - Register type with engine - calling
qmlRegisterTypein your main.cpp - QML extension plugins - To be discussed next
Context properties are easy to use for small applications. They do not require many effort you just expose your system API with kind of global objects. It is helpful to ensure there will be no naming conflicts (e.g by using a special character for this ($) for example $.currentTime). $ is a valid character for JS variables.
Registering QML types allows the user to control the lifecycle of an c++ object from QML. This is not possible with the context properties. Also it does not pollute the global namespace. Still all types need to be registered first and by this all libraries need to be linked on application start, which in most cases is not really a problem.
The most flexible system is provided by the QML extension plugins. They allow you to register types in a plugin which is loaded when the first QML file calls the import identifier. Also by using a QML singleton there is no need to pollute the global namespace anymore. Plugins allow you to reuse modules across projects, which comes quite handy when you do more than one project with Qt.
For the remainder of this chapter will focus on the qml extension plugins. As they provide the greates flexibility and reuse.
Plugin Content
A plugin is a library with a defined interface, which is loaded on demand. This differs from a library as a library is linked and loaded on startup of the application. In the QML case the interface is called QQmlExtensionPlugin. There are two methods interesting for us initializeEngine() and registerTypes(). When the plugin is loaded first the initializeEngine() is called, which allows us to access the engine to expose plugin objects to the root context. In the majority you will only use the registerTypes() method. This allows you to register you custom QML types with the engine on the provided url.
Let us step back a little bit and think about a potential file IO type which would allow us to read/write small text files form QML. A first iteration could look like this in a mocked QML implementation.
// FileIO.qml (good)
QtObject {
    function write(path, text) {};
    function read(path) { return "TEXT"}
}
This is a pure qml implementation of a possible C++ based QML API for exploring an API. We see we should have a read and write function. Where the write function takes a path and a text and the read function takes a path and returns a text. As it looks path and text are common parameters and maybe we can extract them as properties.
// FileIO.qml (better)
QtObject {
    property url source
    property string text
    function write() { // open file and write text };
    function read() { // read file and assign to text };
}
Yes this looks more like a QML API. We use properties to allow our environment to bind to our properties and react on changes.
To create this API in C++ we would need to create an interface something like this.
class FileIO : public QObject {
    ...
    Q_PROPERTY(QUrl source READ source WRITE setSource NOTIFY sourceChanged)
    Q_PROPERTY(QString text READ text WRITE setText NOTIFY textChanged)
    ...
public:
    Q_INVOKABLE void read();
    Q_INVOKABLE void write();
    ...
}
This FileIO type need to be registered with the QML engine. We want to use it under the “org.example.io” module
import org.example.io 1.0

FileIO {
}
A plugin could expose several types with the same module. But it can not expose several modules from one plugin. So there is a one to one relationship between modules and plugins. This relationship is expressed by the module identifier.
Creating the plugin
Qt Creator contains a wizard to create a QtQuick 2 QML Extension Plugin we use it to create a plugin called fileio with a FileIO object to start with in the module “org.example.io”.
The plugin class is dervived from QQmlExtensionPlugin and implements the registerTypes() function. The Q_PLUGIN_METADATA line is mandatory to identify the plugin as an qml extension plugin. Besides this there is nothing spectacular going on.
#ifndef FILEIO_PLUGIN_H
#define FILEIO_PLUGIN_H

#include <QQmlExtensionPlugin>

class FileioPlugin : public QQmlExtensionPlugin
{
    Q_OBJECT
    Q_PLUGIN_METADATA(IID "org.qt-project.Qt.QQmlExtensionInterface")

public:
    void registerTypes(const char *uri);
};

#endif // FILEIO_PLUGIN_H
In the implementation of the registerTypes we simply register our FileIO class using the qmlRegisterType function.
#include "fileio_plugin.h"
#include "fileio.h"

#include <qqml.h>

void FileioPlugin::registerTypes(const char *uri)
{
    // @uri org.example.io
    qmlRegisterType<FileIO>(uri, 1, 0, "FileIO");
}
Interestingly we can not see here the module URI (e.g. org.example.io). This seems to be set from the outside.
When you look into your project directory you will find a qmldir file. This file specifies the content of your qml plugin or better the QML side of your plugin. It should look like this for you.
module org.example.io
plugin fileio
The module is the URI under which your plugin is reachable by others and the plugin line must be identical with your plugin file name (under mac this would be libfileio_debug.dylib on the file system and fileio in the qmldir). These files where created by Qt Creator based on the given information. The module uri is also available in the .pro file. There is is used to build up the install directory.
When you call make install in your build folder the library will be copied into the Qt qml folder (for Qt 5.4 on mac this would be “~/Qt/5.4/clang_64/qml”. The exact path depends on you Qt installation location and the used compiler on your system). There you will find a the library inside the “org/example/io” folder. The content are these two files currently
libfileio_debug.dylib
qmldir
When importing a module called “org.example.io”, the qml engine will look in one of the import paths and tries to locate the “org/example/io” path with a qmldir. The qmldir then will tell the engine which library to load as a qml extension plugin using which module URI. Two modules with the same URI will override each other.
FileIO Implementation
The FileIO implementation is straightforward. Remember the API we want to create should look like this.
class FileIO : public QObject {
    ...
    Q_PROPERTY(QUrl source READ source WRITE setSource NOTIFY sourceChanged)
    Q_PROPERTY(QString text READ text WRITE setText NOTIFY textChanged)
    ...
public:
    Q_INVOKABLE void read();
    Q_INVOKABLE void write();
    ...
}
We will leave out the properties, as they are simple setters and getters.
The read method opens a file in read mode and reads the data using a text stream.
void FileIO::read()
{
    if(m_source.isEmpty()) {
        return;
    }
    QFile file(m_source.toLocalFile());
    if(!file.exists()) {
        qWarning() << "Does not exits: " << m_source.toLocalFile();
        return;
    }
    if(file.open(QIODevice::ReadOnly)) {
        QTextStream stream(&file);
        m_text = stream.readAll();
        emit textChanged(m_text);
    }
}
When the text is changed it is necessary to inform others about the change using emit textChanged(m_text). Otherwise property binding will not work.
The write method does the same but opens the file in write mode and uses the stream to write the contents.
void FileIO::write()
{
    if(m_source.isEmpty()) {
        return;
    }
    QFile file(m_source.toLocalFile());
    if(file.open(QIODevice::WriteOnly)) {
        QTextStream stream(&file);
        stream << m_text;
    }
}
Do not forget to call make install at the end. Otherwise your plugin files will not be copied over to the qml folder and the qml engine will not be able to locate the module.
As the reading and writing is blocking you should only use this FileIO for small texts, otherwise you will block the UI thread of Qt. Be warned!
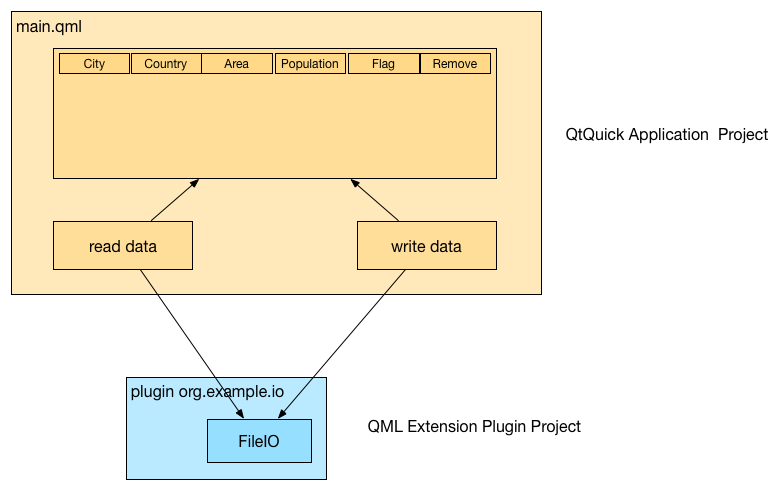
Using FileIO
Now we can use our newly created file to access some nice data. For this example we want to read some city data in a JSON format and display it in a table. We will use two projects, one the extension plugin (called fileio) which provides us a way to read and write text from a file and the other one, which displays the data in a table (CityUI) by using the file io for reading and writing of files. The data used in this example is in the cities.json file.
JSON is just text, which is formatted in such a way that it can be converted into a valid JS object/array and back to text. We use our FileIO to read the JSON formatted data and convert it into a JS object using JSON.parse(). The data is later used as a model to the table view. This is roughly the content of our read document function. For saving we convert the data back into a text format and use the write function for saving.
The city JSON data is a formatted text file, with a set of city data entries, where each entry contains interesting data about the city.
[
    {
        "area": "1928",
        "city": "Shanghai",
        "country": "China",
        "flag": "22px-Flag_of_the_People's_Republic_of_China.svg.png",
        "population": "13831900"
    },
    ...
]
The Application Window
We use the Qt Creator QtQuick Application wizard to create a Qt Quick controls based application. We will not use the new QML forms as this is difficult to explain in a book, although the new forms approach with a ui.qml file is much more usable than previous. So you can remove/delete the forms file for now.
The basic setup is an ApplicationWindow which can contain a toolbar, menubar and statusbar. We will only use the menubar to create some standard menu entries for opening and saving the document. The basic setup will just display an empty window.
import QtQuick 2.5
import QtQuick.Controls 1.3
import QtQuick.Window 2.2
import QtQuick.Dialogs 1.2

ApplicationWindow {
    id: root
    title: qsTr("City UI")
    width: 640
    height: 480
    visible: true
}
Using Actions
To better use/reuse our commands we use the QML Action type. This will allow us later to use the same action also for a potential tool bar. The open and save and exit actions are quit standard. The open and save action do not contain any logic yet, this we will come later. The menubar is created with a file menu and these three action entries. Additional we prepare already a file dialog, which will allow us to pick our city document later. A dialog is not visible when declared, you need to use the open() method to show it.
...
Action {
    id: save
    text: qsTr("&Save")
    shortcut: StandardKey.Save
    onTriggered: { }
}

Action {
    id: open
    text: qsTr("&Open")
    shortcut: StandardKey.Open
    onTriggered: {}
}

Action {
    id: exit
    text: qsTr("E&xit")
    onTriggered: Qt.quit();
}

menuBar: MenuBar {
    Menu {
        title: qsTr("&File")
        MenuItem { action: open }
        MenuItem { action: save }
        MenuSeparator { }
        MenuItem { action: exit }
    }
}

...

FileDialog {
    id: openDialog
    onAccepted: { }
}
Formatting the Table
The content of the city data shall be displayed in a table. For this we use the TableView control and declare 4 columns: city, country, area, population. Each column is a standard TableViewColumn. Later we will add columns for the flag and remove operation which will require a custom column delegate.
TableView {
    id: view
    anchors.fill: parent
    TableViewColumn {
        role: 'city'
        title: "City"
        width: 120
    }
    TableViewColumn {
        role: 'country'
        title: "Country"
        width: 120
    }
    TableViewColumn {
        role: 'area'
        title: "Area"
        width: 80
    }
    TableViewColumn {
        role: 'population'
        title: "Population"
        width: 80
    }
}
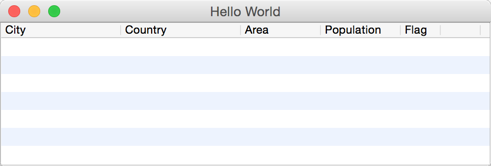
Now the application should show you a menubar with a file menu and an empty table with 4 table headers. The next step will be to populate the table with useful data using our FileIO extension.
The cities.json document is an array of city entries. Here is an example.
[
    {
        "area": "1928",
        "city": "Shanghai",
        "country": "China",
        "flag": "22px-Flag_of_the_People's_Republic_of_China.svg.png",
        "population": "13831900"
    },
    ...
]
Our job is it to allow the user to select the file, read it, convert it and set it onto the table view.
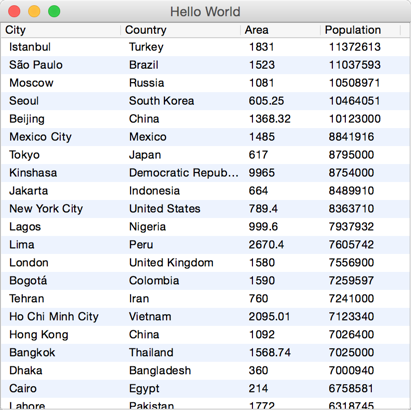
Reading Data
For this we let the open action open the file dialog. When the user has selected a file the onAccepted method is called on the file dialog. There we call the readDocument() function. The readDocument() function sets the url from the file dialog to our FileIO object and calls the read() method. The loaded text from FileIO is then parsed using the JSON.parse() method and the resulting object is directly set onto the table view as a model. How convenient is that.
Action {
    id: open
    ...
    onTriggered: {
        openDialog.open()
    }
}

...

FileDialog {
    id: openDialog
    onAccepted: {
        root.readDocument()
    }
}

function readDocument() {
    io.source = openDialog.fileUrl
    io.read()
    view.model = JSON.parse(io.text)
}


FileIO {
    id: io
}
Writing Data
For saving the document, we hook up the save action to the saveDocument() function. The save document function takes the model from the view, which is a JS object and converts it into a string using the JSON.stringify() function. The resulting string is set to the text property of our FileIO object and we call write() to save the data to disk. The “null” and “4” paramters on the stringify function will format the resulting JSON data using indentation with 4 spaces. This is just for better reading of the saved document.
Action {
    id: save
    ...
    onTriggered: {
        saveDocument()
    }
}

function saveDocument() {
    var data = view.model
    io.text = JSON.stringify(data, null, 4)
    io.write()
}

FileIO {
    id: io
}
This is basically the application with reading, writing and displaying a JSON document. Think about all the time spend by writing XML readers and writers. With JSON all you need is a way to read and write a text file or send receive a text buffer.
Finishing Touch
The application is not fully ready yet. We still want to show the flags and allow the user to modify the document by removing cities from the model.
The flags are stored for this example relative to the main.qml document in a flags folder. To be able to show them the table column needs to define a custom delegate for rendering the flag image.
TableViewColumn {
    delegate: Item {
        Image {
            anchors.centerIn: parent
            source: 'flags/' + styleData.value
        }
    }
    role: 'flag'
    title: "Flag"
    width: 40
}
That is all. It exposes the flag property from the JS model as styleData.value to the delegate. The delegate then adjust the image path to pre-pend 'flags/' and displays it.
For removing we use a similar technique to display a remove button.
TableViewColumn {
    delegate: Button {
        iconSource: "remove.png"
        onClicked: {
            var data = view.model
            data.splice(styleData.row, 1)
            view.model = data
        }
    }
    width: 40
}
For the data removal operation we get hold on the view model and then remove one entry using the JS splice function. This method is available to us as the model is from the type JS array. The splice method changes the content of an array by removing existing elements and/or adding new elements.
A JS array is unfortunately not so smart as a Qt model like the QAbstractItemModel, which will notify the view about row changes or data changes. The view will not show any updated data by now as it is never notified about any changes. Only when we set the data back to the view, the view recognizes there is new data and refreshes the view content. Setting the model again using view.model = data is a way to let the view know there was a data change.

Summary
The plugin created is a very simple plugin but it can be re-used now and extended by other types for different applications. Using plugins creates a very flexible solution. For example you can now start the UI by just using the qmlscene. Open the folder where your CityUI project is an start the UI with qmlscene main.qml. I really encourage you to write your applications in a way so that they work with a qmlscene. This has a tremendous increase in turnaround time for the UI developer and it is also a good habbit to keep a clear separation.
Using plugins has one drawback the deployment gets more difficult for simple applications. You need now to deploy your plugin with your application. If this is a problem for you you can still use the same FileIO object to register it directly in your main.cpp using qmlRegisterType. The QML code would stay the same.
Often in larger projects you do not use an application as such. You have a simple qml runtime similar to qmlscene and require all native functionality to come as plugins. And your projects are simple pure qml projects using these qml extension plugins. This provides a great flexibility and removes the compilation step for UI changes. After editing a QML file you just need to run the UI. This allows the user interface writers to stay flexible and agile to make all these little changes to push pixels.
Plugins provide a nice and clean separation between C++ backend development and QML frontend development. When developing QML plugins always have the QML side in mind and do not hesitate to start with a QML only mockup first to validate your API before you implement it in C++. If an API is written in C++ people often hesitate to change it or not to speak of to rewrite it. Mocking an API in QML provides much more flexibility and less initial investment. When using plugins the switch between a mocked API and the real API is just changing the import path for the qml runtime.